The Redmi Note 13 4G is a feature-packed smartphone that has been gaining popularity since its release. With its powerful processor, impressive camera and ample storage, it’s no surprise that many users are looking for ways to optimize their device even further.
One way to do this is by rooting your Redmi Note 13 4G, which gives you full control over your device and allows you to customize it in ways that are otherwise not possible. In this guide, we will walk you through the steps on how to root Redmi Note 13 4G.
Contents
What is Rooting Android?

Rooting is the process of gaining privileged control, also known as root access, over an Android device’s operating system. This allows users to make changes to their device’s software that are otherwise restricted by the manufacturer.
With root access, users can uninstall pre-installed bloatware, install custom ROMs, and use apps that require advanced permissions.
Note: This guide is universal for rooting Redmi Note 13 4G. We are not responsible if your device becomes bricked.
Rooting your Redmi Note 13 4G comes with its fair share of advantages and disadvantages. It’s essential to consider both before deciding to root your device.
Advantages of Rooting:
- Custom ROM Installation: Rooting allows you to install custom ROMs on your device that might offer a better user experience compared to the stock ROM.
- Android Updates: Even if your device manufacturer has stopped providing updates, rooting can allow you to update your device to a newer Android version.
- Incompatible Apps: Rooting your device allows you to install apps that your device manufacturer might not typically support.
- Custom Kernel: You can flash a custom kernel to your device after rooting, which can enhance your device’s performance.
- Complete Backup: With rooting, you can take a complete backup of your device, offering a reliable safety net.
Disadvantages of Rooting:
- Void Warranty: As soon as you root your device, your phone warranty becomes void.
- Security Issues: Rooting your Redmi Note 13 4G may expose it to various security risks.
- Lagging Issues: It might cause your device to lag, especially if not done correctly.
- Risk of Bricking: Missing any steps while rooting, there is a high chance that your device might get bricked, rendering it unusable.
While rooting can unlock numerous additional features and capabilities for your Redmi Note 13 4G, it also comes with significant risks.
It’s advisable to proceed with caution and carry out extensive research before deciding to root your device.
Step 1: Unlock the Bootloader on your Redmi Note 13 4G
Before rooting your Redmi Note 13 4G device, you must first unlock the bootloader. The bootloader controls the software loaded when booting up and is locked by default.
I have written a dedicated guide on how to unlock the Redmi Note 13 4G bootloader. Please go through that first. The process involves enabling Developer options, connecting to the Mi Unlock tool, and getting unlock permission from Xiaomi.
Step 2: Install TWRP on your Redmi Note 13 4G
To enable root access on your device, it is necessary to install TWRP. TWRP stands for Team Win Recovery Project, and it is a custom recovery tool that allows you to install custom ROMs, kernels, and other modifications on your device. Here’s how to install TWRP on your Redmi Note 13 4G:
- Download the TWRP Image: Visit the TWRP website and download the TWRP image that corresponds to your Xiaomi device.
- Prepare the Files: Once downloaded, place the TWRP image in the same directory as your ADB and Fastboot files.
- Enter Fastboot Mode: Now, boot your device into fastboot mode. This can be achieved by holding down the Power and Volume Down buttons simultaneously until the fastboot screen appears.
- Connect your Device: Using a USB cable, connect your device to your computer.
- Open Command Prompt or Terminal: Navigate to the directory where you have adb and fastboot installed, and open a command prompt (Windows) or terminal window (Mac/Linux).
- Flash the TWRP Image: Type the following command into the console and press enter:
fastboot flash recovery TWRP_IMAGE_NAME.img
Replace “TWRP_IMAGE_NAME” with the actual name of the TWRP image that you downloaded. - Boot the TWRP Image: After successfully flashing TWRP, type the following command and press enter:
fastboot boot TWRP_IMAGE_NAME.img
Again, replace “TWRP_IMAGE_NAME” with the name of the TWRP image you downloaded. - Success: TWRP will now boot, and you can start using it on your Redmi Note 13 4G.
The successful completion of these steps means that you have successfully installed TWRP on your device. Now, you can proceed with other advanced tasks like rooting or installing custom ROMs.
Step 3: Root your Redmi Note 13 4G using TWRP Recovery
- Download the Necessary Files:
- Download the latest versions of the Magisk Zip and Lazy flasher Zip files.
- Move the downloaded files to the external storage of your Redmi Note 13 4G.
- Reboot your device in TWRP recovery mode by pressing and holding the Volume Up + Power button until the boot screen appears, then release the Power button.
- Install Magisk:
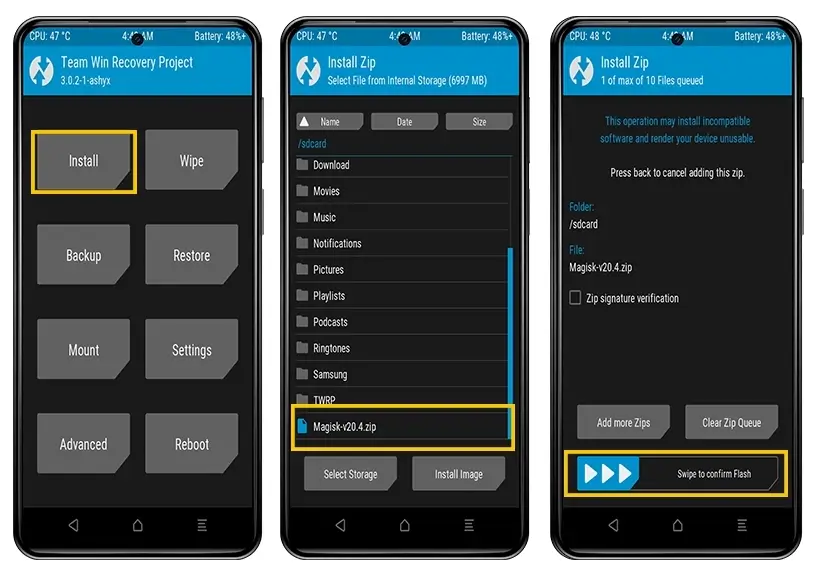
- On the TWRP main screen, tap on “Install.”
- Locate and select the Magisk installer zip file.
- Swipe the slider at the bottom of the screen to flash the file and begin the installation process.
- Proceed to flash the Lazy flasher Zip file on your device.
- After the flashing process completes, tap on “Reboot System”.
- Open the Magisk App. If all checks on the app screen appear green, the installation was successful. If the app is not present, manually download and install it.
Following these steps carefully will successfully root your Redmi Note 13 4G using the TWRP Recovery. If you encounter any issues, feel free to ask for help in the comments section.
Step 4: Checking Root Status on Redmi Note 13 4G
To verify the root status of your Redmi Note 13 4G, you’ll need to follow these steps:
- Head over to the Google Play Store and download the Root Checker app.
- After the app is installed, open it.
- Tap on “Verify Root” on the app’s interface.
If your Xiaomi device has been successfully rooted, you’ll see a message that reads, “Congratulations! Root access is properly installed on this device!” as demonstrated in the screenshot above.
If you don’t see this message, consider repeating the previous steps or seek assistance in the comments section below.
About Redmi Note 13 4G:
The Redmi Note 13 4G, unveiled on January 15, 2024, brings impressive features to the table. Its connectivity options encompass GSM, HSPA, and LTE technologies, with support for various bands ensuring global compatibility.
The device boasts a sleek and robust body, measuring 162.3 x 75.6 x 8 mm and weighing 188.5 g, featuring a Hybrid Dual SIM setup with IP54 dust and splash resistance.
The smartphone showcases a stunning 6.67-inch AMOLED display with a 120Hz refresh rate, offering vivid visuals at 1800 nits peak brightness. Under the hood, it runs on Android 13 with MIUI 14, powered by the Qualcomm SM6225 Snapdragon 685 chipset.
The Redmi Note 13 4G provides a versatile memory configuration, with options for 128GB storage and 6GB or 8GB RAM, or 256GB storage and 8GB RAM, all supported by UFS 2.2 technology.
The device excels in photography with a triple main camera setup featuring a 108 MP wide lens, 8 MP ultrawide lens, and a 2 MP macro lens. A 16 MP front camera ensures high-quality selfies.
Additional features include stereo speakers, a 5000 mAh non-removable battery with 33W wired charging, and a range of color options, including Midnight Black, Mint Green, Ice Blue, and Ocean Sunset.
The Redmi Note 13 4G stands out as a compelling choice for users seeking a feature-packed and stylish smartphone experience.
Conclusion
Rooting your Redmi Note 13 4G with TWRP and Magisk presents an opportunity to enhance your device’s functionality beyond the factory settings. By carefully following the steps above, even a novice should be able to achieve root access.
Remember to verify the root status using the Root Checker application. Rooting provides you with administrative permissions, but this comes with heightened responsibility. Always be cautious while making system-level changes to avoid potential device damage. Happy rooting!
